| IP & NEMA Rating Comparison | |||
| IP Rating | NEMA Definition | NEMA Rating | |
| IP21 | Protected against solid foreign objects of 12mm in diameter and greater & vertically falling water drops. | Enclosures constructed for indoor used to provide a degree of protection to personnel against incidental contact with the enclosed equipment, to provide a degree of protection against falling dirt, and to provide a degree of protection against dripping and light splashing of liquids. | 2 |
| IP54 | Protected against dust - Limited to ingress (no harmful deposit) & water sprayed from all directions - Limited to ingress permitted. | Enclosures constructed for either indoor or outdoor used to provide a degree of protection to personnel against incidental contact with the enclosed equipment; to proved a degree of protection against falling dirt, rain, sleet, snow, and windblown dust; and that will undamaged by external formation of ice on the enclosure. | 3 |
| IP24 | Protected against solids objects over 12 mm (e.g. fingers) & water sprays from all directions, limited ingress permitted. | Enclosures constructed for either indoor or outdoor used to provide a degree of protection to personnel against incidental contact with the enclosed equipment; to provide a degree of protection against falling dirt, rain, sleet, and snow; and that will be undamaged by external formation of ice on the enclosure. | 3R |
| IP54 | Protected against dust - Limited to ingress (no harmful deposit) & water sprayed from all directions - Limited to ingress permitted. | Enclosures constructed for either indoor or outdoor use to provide a degree of protection to personnel against incidental contact with the enclosed equipment; to provide a degree of protection against falling dirt, rain, sleet, snow, and windblown dust; and in which the external mechanism(s) remain operable when ice laden. | 3s |
| IP56 | Protected against dust - Limited to ingress (no harmful deposit) & strong jets of water from all directions - Limited to ingress permitted. | Enclosures constructed for either indoor or outdoor use to provide a degree of protection to personnel against incidental contact with the enclosed equipment; to provide a degree of protection against falling dirt, rain, sleet, snow, windblown dust, splashing water, and hose-directed water; and that will be undamaged by the external formation of ice on the enclosure. | 4 & 4X |
| IP65 | Totally protected against dust & low pressure jets if water from all directions, limited ingress permitted. | ||
| IP66 | Totally protected against dust & strong jets of water from all directions - Limited to ingress permitted. | ||
| IP52 | Protected against dust, limited ingress (no harmful deposit) direct water sprays up to 15 degree from the vertical. | Enclosures constructed for indoor use to provide a degree of protection to personnel against incidental contact with the enclosed equipment; to provide a degree of protection against falling dirt; against settling airborne dust, lint, fibers, and flyings; and to provide a degree of protection against dripping and light splashing of liquids. | 5 |
| IP67 | Totally protected against dust & the effects of temporary immersion to water between 15 cm and 1m. Duration of test 30 minutes. | Enclosures constructed for either indoor or outdoor use to provide a degree of protection to personnel against incidental contact with the enclosed equipment; to provide a degree of protection against falling dirt; against hose-directed water and the entry of water during occasional temporary submersion at a limited depth; and that will be undamaged by the external formation of ice on the enclosure. | 6 & 6P |
| IP52 | Protected against dust, limited ingress (no harmful deposit) & direct water sprays up to 15 degree from the vertical. | Enclosures constructed (without knockouts) for indoor use to provide a degree of protection to personnel against incidental contact with the enclosed equipment; to provide a degree of protection against falling dirt; against circulating dust, lint, fibers, and flying; and against dripping and light splashing of liquids. | 12 & 12K |
| IP54 | Protected against dust - Limited to ingress (no harmful deposit) & water sprayed from all directions - Limited to ingress permitted. | Enclosures constructed for indoor use to provide a degree of protection to personnel against incidental contact with the enclosed equipment; to provide a degree of protection against falling dirt; against circulating dust, lint, fibers, and flyings; and against the spraying, splashing, and seepage of water, oil, and noncorrosive coolants. | 13 |
Onze producten
No subcategories


With more and more outdoor LCD Display applications were conducted, the readability of the LCD panel becomes an critical issue.
Because the LCD display doesn't emit light, it needs external light source ( backlight ), thus cause the LCD displays were barely to see while in a bright environment especially under the sun light.
The best solution to direct sunlight readability is said to be transflective LCD, which reflect ambient light to increase its light level. Yet the transflective LCD display compromises the transmission rate and the contrast because it needs additional reflective layer, not to mention the high cost problem. Right now the transflective LCD panel is not popular due to its weakness of the above mentioned issues.
For those outdoor LCD display applications, we suggest other solutions which are more cost-efficient, such as :
- High Brightness LCD panel
- Optical Bonding
- Anti-reflection surface
- Additional Mask to prevent direct sun light
With the proper combination / selection of the above solutions, we can manage to deliver a cost-efficient solution to meet customer's requirement.
There are 2 solutions for the high brightness requirements :
1. High Efficient LED Light Bar Replacement
Replace the original CCFL or LED light bar with a high efficient LED light bar to increased brightness, also eliminates the inverter thereby improving EMI emissions.
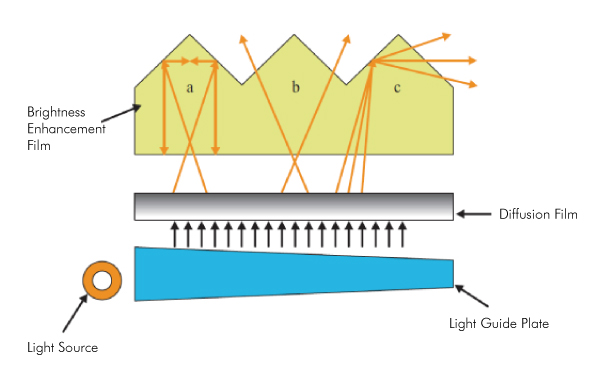
2. Brightness Enhancement Film Replacement
Increases panel brightness by 60% with a single sheet and up to 120% with two crossed sheets.
Installation Guide for Panel Mount Product ( Screw Mount and Clamp Mount )
There are 2 installation solutions for Panel Mount Products:
I. Screw Mount Installation
II. Clamp Mount Installation
In general, screw mount is for those screen size smaller than or equal to 24”, and clamp mount is for the screen size greater than 24”. We suggest at least 2 people to do the installation. One is at the front side of the mounting wall; another is at the back side of the mounting wall.
Screw Mount Installation
- Get the Mechanical Drawing
You can get the mechanical drawing of your product model from our web site. If you can’t find the correct mechanical drawing, please contact us. - Make the cut out
There is the cutout dimension on the Mechanical Drawing. Make sure your cutout match the cutout dimension requirement. If the cutout is too small, there will be some interference. If the cut out is too big, you can’t have the screw holes at correct position. - Drill the screw holes
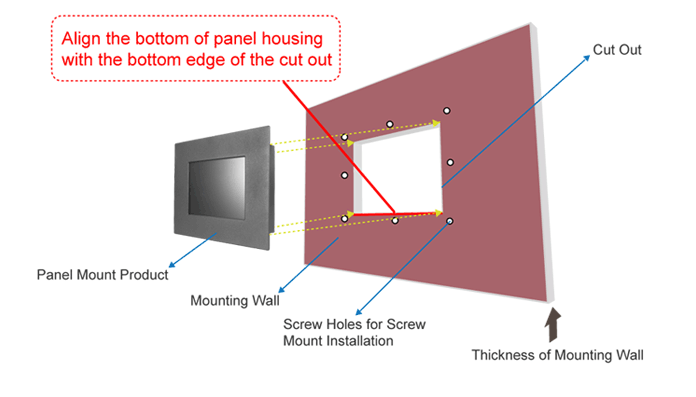
You have to drill the screw holes on your mounting wall for mounting the panel. You can find the position of the screw holes on the mechanical drawing. Make sure the position of the screw holds correctly match the position on the mechanical drawing, otherwise you won’t be able to install the screws. The best way to mount the panel is to align the bottom of the panel housing with the bottom edge of the cut out. This way can help hold the panel steadily.
Front Side of the Mounting Wall
Rear of the Mounting Wall
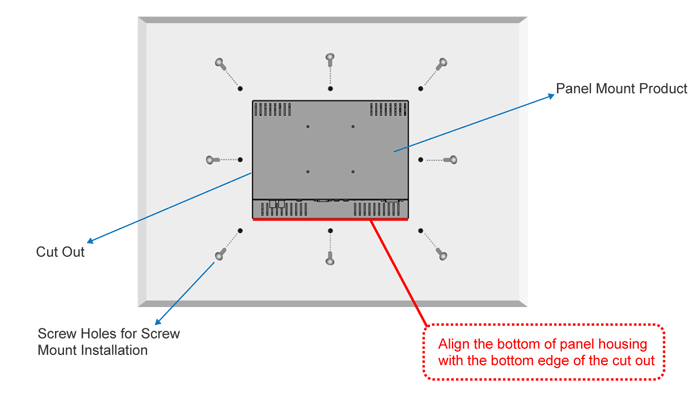
Fig. 1
- Prepare the accessory
For screw mount installation, you need to prepare the correct screws and screw driver by yourself. Make sure the length and the diameter of the screws are correctly fit the requirement. Because the maximum depth of the standoff on the panel is 4 mm, the length of your screw got to be the thickness of your mounting wall + 4 mm. With the correct length screw can ensure the mounting of the panel tightly & securely. - Installation
Fit the panel in the cut out from the front side of the mounting wall. Adjust the position of the panel to fit all the screw holes position properly. At the back side of the mounting wall, screw the screw through the screw hole to mount the panel tightly. Finish all the screws mounting one by one then you can have a secure installation for your Panel Mount product. See Fig. 2.
Clamp Mount Installation
1 Get the Mechanical Drawing
You can get the mechanical drawing of your product model from our web site. If you can't find the correct mechanical drawing, please contact us.
2 Make the cut out
There is the cutout dimension in the Mechanical Drawing. Make sure your cutout meet the cutout dimension requirement. If the cutout is too small, there will be some interference. If the cutout is too big, you can't have the clamps mounting securely.
Please note that there is thickness limitation of the mounting wall for clamp mount installation. The mounting wall thickness limitation for greater than 24" panel is 20 mm. For those panels equal to or smaller than 24", it is 12 mm.
Fig. 2
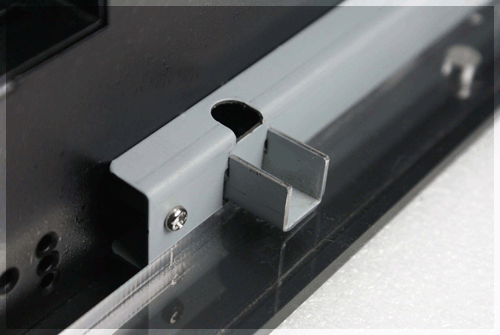
3 Prepare the accessory
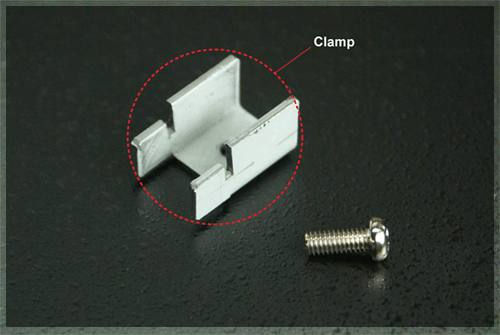
For clamp mount installation, you will receive at least 8 clamps and screws together with your unit and you have to prepare the screw driver by yourself. There are at least 2 clamps for each side of the panel. The clamp looks as the below picture. The clamp and the screw are paired.
4 Installation
Fit the panel in the cut out from the front side of the mounting wall.
The best way to mount the panel is to align the bottom of the panel housing with the bottom edge of the cut out. ( as Fig. 2) This way can help hold the panel steadily.
At the back side of the mounting wall, insert the clamp into the slide hole at the side bracket on the panel.
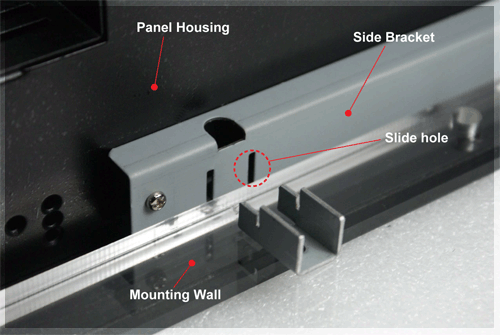
Fit the screw on the clamp and screw it tightly.

Finish all the clamps mounting one by one then you can have a secure installation for your Panel Mount product.