

Installation Guide for Panel Mount Product ( Screw Mount and Clamp Mount )
There are 2 installation solutions for Panel Mount Products:
I. Screw Mount Installation
II. Clamp Mount Installation
In general, screw mount is for those screen size smaller than or equal to 24”, and clamp mount is for the screen size greater than 24”. We suggest at least 2 people to do the installation. One is at the front side of the mounting wall; another is at the back side of the mounting wall.
Screw Mount Installation
- Get the Mechanical Drawing
You can get the mechanical drawing of your product model from our web site. If you can’t find the correct mechanical drawing, please contact us. - Make the cut out
There is the cutout dimension on the Mechanical Drawing. Make sure your cutout match the cutout dimension requirement. If the cutout is too small, there will be some interference. If the cut out is too big, you can’t have the screw holes at correct position. - Drill the screw holes
You have to drill the screw holes on your mounting wall for mounting the panel. You can find the position of the screw holes on the mechanical drawing. Make sure the position of the screw holds correctly match the position on the mechanical drawing, otherwise you won’t be able to install the screws. The best way to mount the panel is to align the bottom of the panel housing with the bottom edge of the cut out. This way can help hold the panel steadily.
Front Side of the Mounting Wall
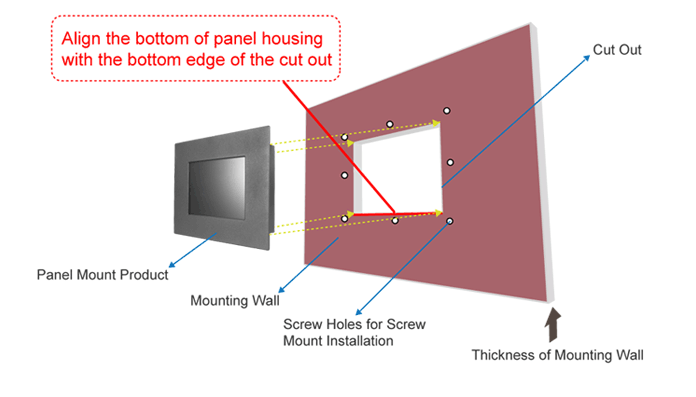
Rear of the Mounting Wall
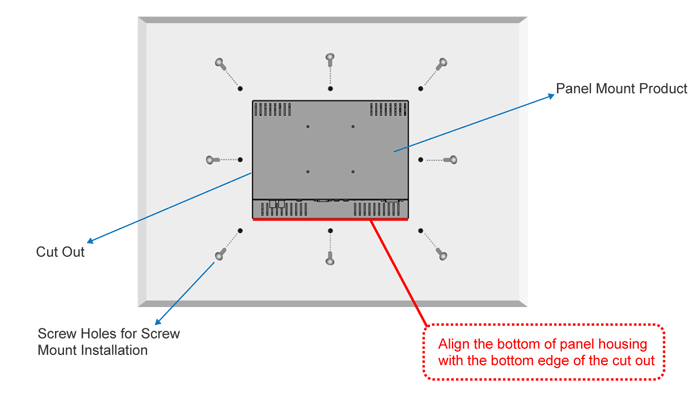
Fig. 1
- Prepare the accessory
For screw mount installation, you need to prepare the correct screws and screw driver by yourself. Make sure the length and the diameter of the screws are correctly fit the requirement. Because the maximum depth of the standoff on the panel is 4 mm, the length of your screw got to be the thickness of your mounting wall + 4 mm. With the correct length screw can ensure the mounting of the panel tightly & securely. - Installation
Fit the panel in the cut out from the front side of the mounting wall. Adjust the position of the panel to fit all the screw holes position properly. At the back side of the mounting wall, screw the screw through the screw hole to mount the panel tightly. Finish all the screws mounting one by one then you can have a secure installation for your Panel Mount product. See Fig. 2.
Clamp Mount Installation
1 Get the Mechanical Drawing
You can get the mechanical drawing of your product model from our web site. If you can't find the correct mechanical drawing, please contact us.
2 Make the cut out
There is the cutout dimension in the Mechanical Drawing. Make sure your cutout meet the cutout dimension requirement. If the cutout is too small, there will be some interference. If the cutout is too big, you can't have the clamps mounting securely.
Please note that there is thickness limitation of the mounting wall for clamp mount installation. The mounting wall thickness limitation for greater than 24" panel is 20 mm. For those panels equal to or smaller than 24", it is 12 mm.
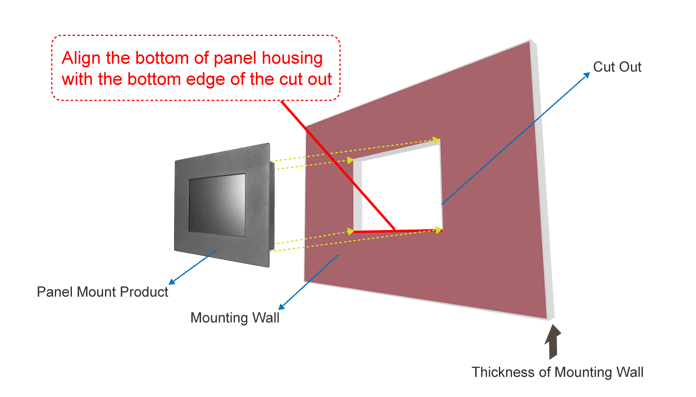
Fig. 2
3 Prepare the accessory
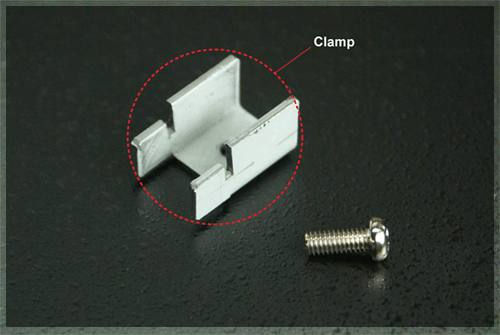
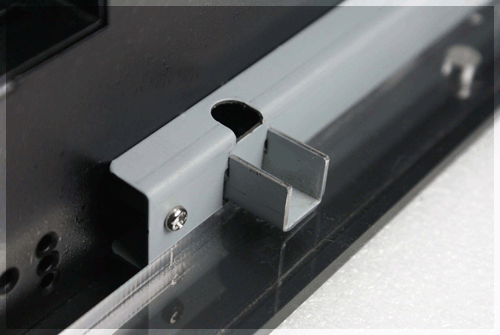
For clamp mount installation, you will receive at least 8 clamps and screws together with your unit and you have to prepare the screw driver by yourself. There are at least 2 clamps for each side of the panel. The clamp looks as the below picture. The clamp and the screw are paired.
4 Installation
Fit the panel in the cut out from the front side of the mounting wall.
The best way to mount the panel is to align the bottom of the panel housing with the bottom edge of the cut out. ( as Fig. 2) This way can help hold the panel steadily.
At the back side of the mounting wall, insert the clamp into the slide hole at the side bracket on the panel.
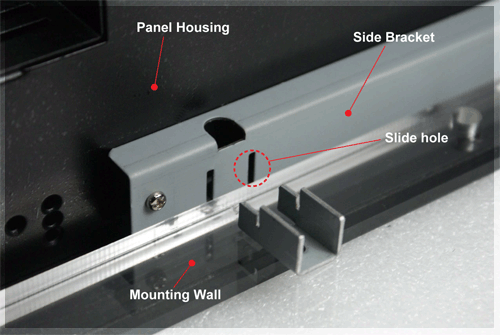
Fit the screw on the clamp and screw it tightly.

Finish all the clamps mounting one by one then you can have a secure installation for your Panel Mount product.